Tokenbound Accounts (TBAs) are changing how NFTs function by linking each NFT to its own smart contract wallet. This opens up exciting possibilities like programmable NFTs, interactive on-chain games, and more personalised dApp experiences.
The Tokenbound SDK simplifies working with tokenbound accounts on Starknet, offering developers an easy way to integrate these accounts into their applications. With this SDK, you can seamlessly:
- Query ERC-6551 account addresses: Retrieve the TBA address linked to any NFT.
- Execute transactions: Manage and perform operations on tokenbound accounts effortlessly.
This guide walks you through setting up your frontend project and integrating the Tokenbound SDK to unlock the full potential of tokenbound accounts in your dApp.
Getting Started
Before diving into the Tokenbound SDK, ensure you have a front-end project ready. Once your project is prepared, you can install the SDK package, which provides all the tools needed to interact with tokenbound account contracts.
Setting up your Frontend project
To get started with integrating Tokenbound accounts, you’ll first need to set up a front-end project. In this example, we’ll use Vite with React and TypeScript for a fast and modern development experience.
Step 1: Create your project:
Run one of the following commands in your terminal to create your project:
Using Yarn:
yarn create viteUsing npm:
npm create vite@latestFollow the prompts to select your project name and framework (choose React with TypeScript). Once the setup is complete, navigate into your project directory:
cd your-project-nameStep 2: Install the Tokenbound SDK
Now, within the frontend project you just created using Vite, install the Tokenbound SDK to enable interactions with Tokenbound accounts:
Using Yarn:
yarn add starknet-tokenbound-sdkUsing npm:
npm install starknet-tokenbound-sdkWith the SDK installed, your project is now ready for integrating and managing Tokenbound accounts on Starknet!
A lot of what we’re going to be talking about today is in the Tokenbound documentation → https://docs.tbaexplorer.com/ .
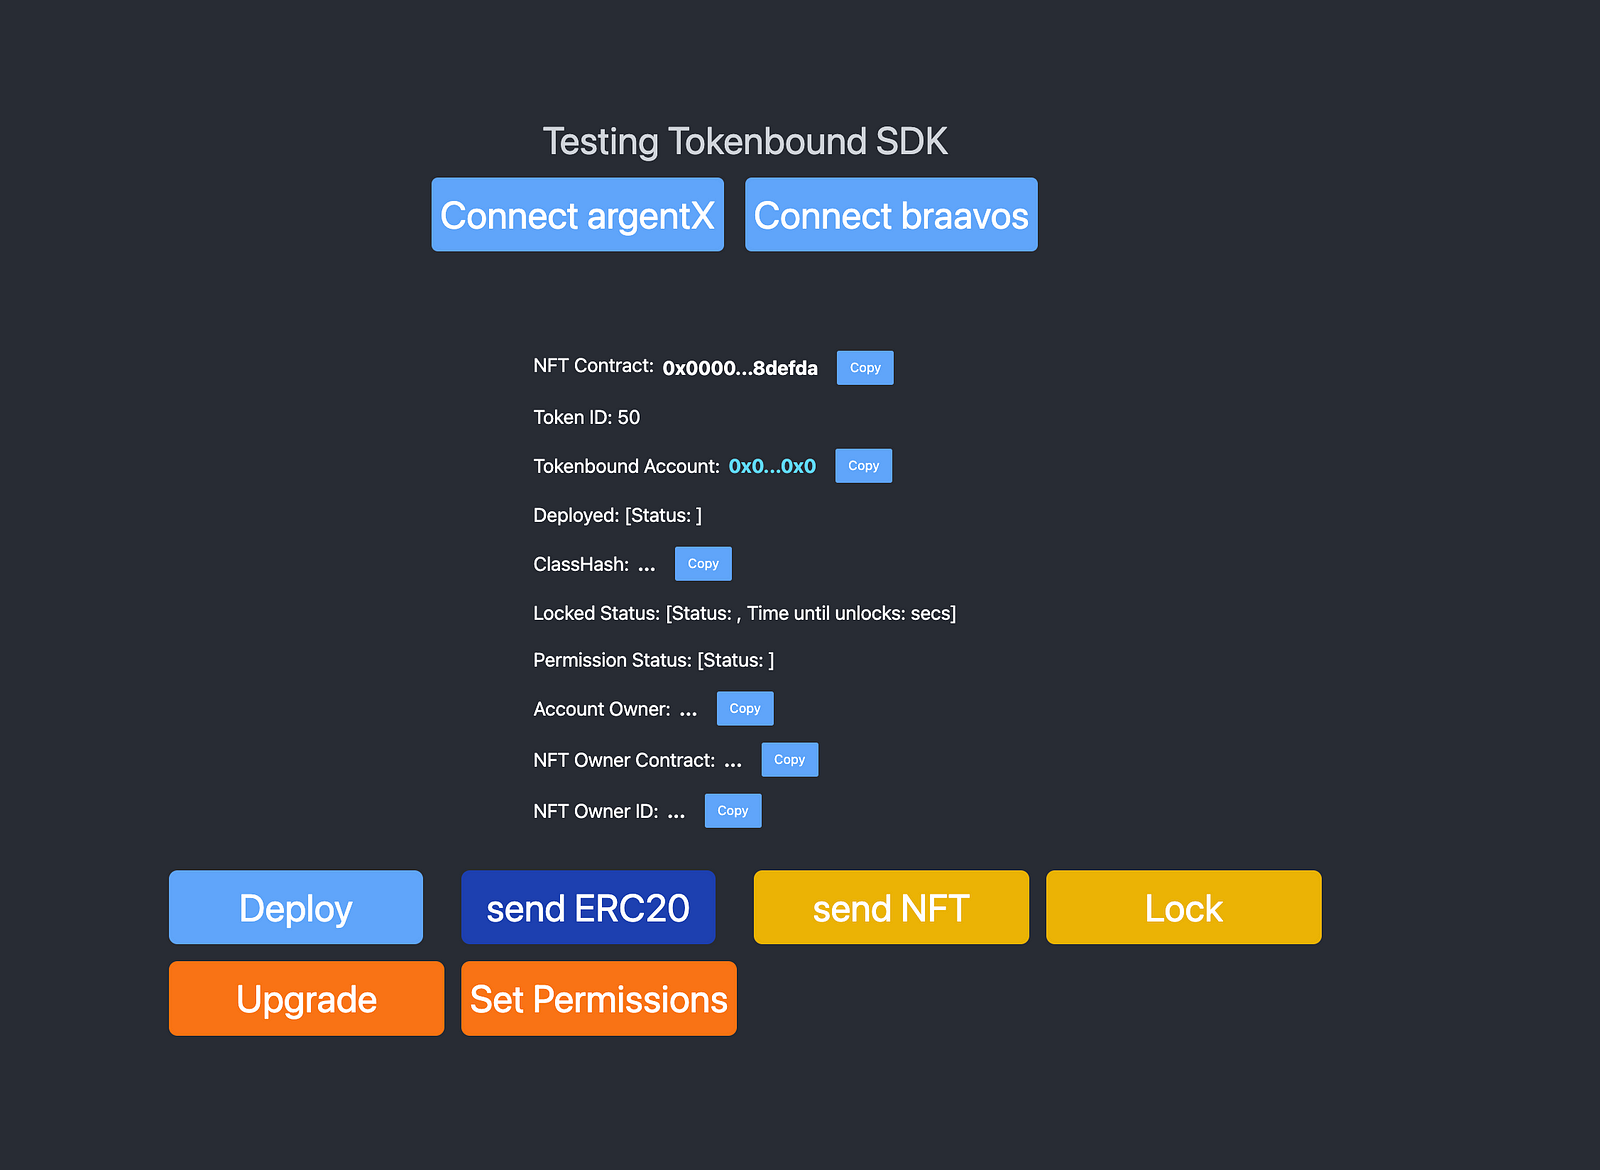
What we’re building
The interface includes functionalities for deploying Tokenbound accounts, transferring tokens, and interacting with deployed accounts.
Full code Implementation: Here’s the complete implementation.
Now that we’re done with the installation.
ext thing to do is set up the Tokenbound Client which would provide an interface for interacting with tokenbound accounts, enabling operations like account creation, transaction execution, token transfers (including ERC-721, ERC-1155, and ERC-20 tokens), and message signing.
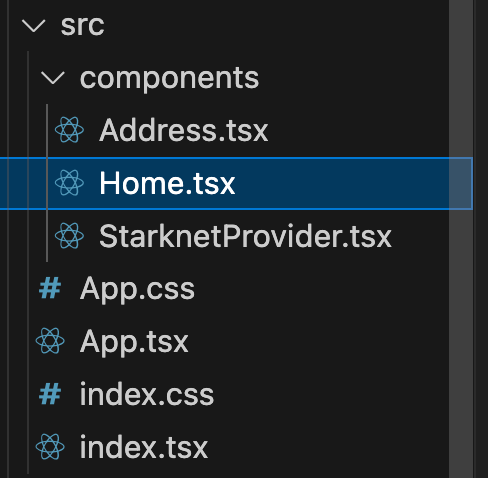
This is my folder structure, and I’m going to be working inside Home.tsx.
Required Imports
import React, { useEffect, useState } from "react";
import { TokenboundClient, Call, TBAVersion, TBAChainID } from "starknet-tokenbound-sdk";
import { useAccount, useConnect } from "@starknet-react/core";
import { disconnect } from "starknetkit";
1. Setting Up Your Tokenbound Client
The first step is to initialize the TokenboundClient.
The Tokenbound Client is the primary interface to interact with the Tokenbound SDK. Setting it up involves creating an instance of the client, which allows you to perform various operations like deploying accounts, executing transactions, transferring tokens, and more.
  const { address, account } = useAccount();
  const [tokenbound, setTokenbound] = useState<TokenboundClient | null>(null);

  const registryAddress: string =
    "0x23a6d289a1e5067d905e195056c322381a78a3bc9ab3b0480f542fad87cc580";
  const implementationAddress: string =
    "0x7396dc2e3ac3b50eac9b12447d7dcc2cfddef27405c680d46d6b13dae90d804";

  useEffect(() => {
    if (account) {
      const options = {
        account: account,
        registryAddress: registryAddress,
        implementationAddress: implementationAddress,
        version: TBAVersion.V3,
        chain_id: TBAChainID.main,
        jsonRPC: "https://free-rpc.nethermind.io/sepolia-juno/v0_7",
      };
      const client = new TokenboundClient(options);
      setTokenbound(client);
    }
  }, [account])
Key Steps and Variables:
client: This is an instance of theTokenboundClientclass. It serves as the gateway to perform all Tokenbound-related operations in your dApp.signer: A signer is required to authenticate and authorize operations. It represents the account (e.g., a wallet like Bravoos or Argent) that will be interacting with the TBA.chainId: The ID of the blockchain network where the Tokenbound Account operations will occur (eg.,mainorsepolia).registryAddressandimplementationAddressare the contract addresses for the Tokenbound registry and implementation.- The
TBAVersionandTBAChainIDspecify the version and chain you’re targeting. - Replace
jsonRPCwith your preferred endpoint.
Explanation:
- Import the
TokenboundClientfrom the SDK. - Pass the
signerandchainIdto theTokenboundClientconstructor to configure the client. - Use this client instance (
client) to perform all subsequent Tokenbound operations.
This setup is foundational, as every interaction with Tokenbound SDK requires the client to be initialized properly.
2. Deploying a Tokenbound Account
This function deploys a new Tokenbound Account, associating a specific NFT with its own smart contract wallet.
Once the client is set up, you can deploy a Tokenbound Account linked to an NFT by calling createAccount. Here’s the function:
const [tokenbound, setTokenbound] = useState<TokenboundClient | null>(null);
const [tbaAccount, setTbaAccount] = useState<string | undefined>("");
const tokenContract =
    "0xNFTContract";
const tokenId = "00";
  const url = `https://sepolia.starkscan.co/contract/${account}`;

const deployAccount = async () => {
  if (tokenbound) {
    try {
      const result = await tokenbound.createAccount({
        tokenContract: tokenContract,
        tokenId: tokenId,
        salt: V2_SALT,
      });

      setTbaAccount(result.account);
      alert("Account deployed successfully");
      console.log(result);
    } catch (error) {
      console.log(error);
    }
  }
};
Click on the Deploy button to deploy the NFT as a Tokenbound Account.
Doing that will call the function for creating tokenbound accounts.

Explanation:
- Identify the NFT for which you want to deploy a Tokenbound Account using its
NFT_CONTRACTaddress andTOKEN_ID. - Call the
createAccountmethod on theTokenboundClientinstance, passing theNFT_CONTRACTandTOKEN_ID. - This function returns the address of the newly created Tokenbound Account (
tbaAddress).
3. Transferring ERC20 Tokens
Transfers ERC20 tokens from the Tokenbound Account to a specified recipient.
const [tbaAccount, setTbaAccount] = useState<string | undefined>("");

const transferERC20 = async () => {
  const ERC20_CONTRACT =
    "OxERC20ContractAddress";
  const recipient = "0xRecipientAddressHere";

  try {
    await tokenbound?.transferERC20({
      tbaAddress: tbaAccount ?? "",
      contractAddress: ERC20_CONTRACT,
      recipient,
      amount: "10000000000000",
    });

    alert("Transfer was successful");
  } catch (error) {
    console.log(error);
  }
};
Note: Update recipient and amount with actual values.
Variable Explanations:
ETH_CONTRACT: The contract address of the ERC20 token you are transferring (e.g., USDC, STRK).recipient: The address to which the tokens will be sent.amount: The amount of tokens to transfer.tokenbound.transferERC20: A method for sending ERC20 tokens from the Tokenbound Account.
4. Transferring NFTs
Transfers an NFT from the Tokenbound Account to a specified recipient:
const transferNFT = async () => {
  const NFT_CONTRACT =
    "OxNFTContractAddress";
  const TOKEN_ID = "00";
  const recipient = "0xRecipientAddressHere";

  try {
    await tokenbound?.transferNFT({
      tbaAddress: tbaAccount ?? "",
      contractAddress: NFT_CONTRACT,
      tokenId: TOKEN_ID,
      sender: tbaAccount as string,
      recipient,
    });

    alert("Transfer was successful");
  } catch (error) {
    console.log(error);
  }
};
Variable Explanations:
NFT_CONTRACT: The contract address of the NFT you are transferring.TOKEN_ID: The unique identifier of the specific NFT being transferred.recipient: The address to which the NFT will be sent.sender: The address of the Tokenbound Account that owns the NFT.tokenbound.transferNFT: A method for transferring NFTs from the Tokenbound Account.
5. Locking a Tokenbound Account
Locks the Tokenbound Account, preventing certain operations until a specified timestamp.
const [tbaAccount, setTbaAccount] = useState<string | undefined>("");

const lockAccount = async () => {
  try {
    await tokenbound?.lock({
      tbaAddress: tbaAccount ?? "",
      lockUntill: 1728057939, // Replace with your timestamp
    });
    alert("Account was locked successfully");
  } catch (error) {
    console.log(error);
  }
};
Variable Explanations:
tbaAddress: The address of the Tokenbound Account to lock.lockUntil: The UNIX timestamp until which the account will remain locked. Replace1728057939with a valid future timestamp.tokenbound.lock: A method to lock the Tokenbound Account.
6. Upgrading the Account
Upgrades the Tokenbound Account to use a new implementation, allowing for updates or feature additions.
const [tbaAccount, setTbaAccount] = useState<string | undefined>("");

const upgradeAccount = async () => {
  try {
    await tokenbound?.upgrade({
      newClassHash: "0xYourNewClassHash",
      tbaAddress: tbaAccount ?? "",
    });
    alert("Account was upgraded successfully");
  } catch (error) {
    console.log(error);
  }
};
Variable Explanations:
newClassHash: The hash of the new implementation that the account will upgrade to. This hash is associated with the smart contract version containing new functionalities or fixes.tbaAddress: The address of the Tokenbound Account being upgraded.tokenbound.upgrade: A method for upgrading the Tokenbound Account.
7. Setting Permissions
Grants or revokes permissions for specific addresses to interact with the Tokenbound Account.
const [tbaAccount, setTbaAccount] = useState<string | undefined>("");

const setPermissions = async () => {
  try {
    await tokenbound?.setPermission({
      tbaAddress: tbaAccount ?? "",
      permissionedAddresses: [0x000.0, 0x000..0],
      permissions: [true, false],
    });
    alert("Permissions added successfully");
  } catch (error) {
    console.log(error);
  }
};
Variable Explanations:
tbaAddress: The address of the Tokenbound Account where permissions are being managed.permissionedAddresses: An array of addresses for which permissions are being set.permissions: An array of boolean values (truefor granting,falsefor revoking) corresponding to thepermissionedAddresses.tokenbound.setPermission: A method to assign or revoke permissions for specified addresses.
Conclusion
In this guide, we explored how to set up a frontend project, initialize the Tokenbound Client, and interact with Tokenbound accounts using the Tokenbound SDK. We also demonstrated functionalities like deploying accounts, transferring tokens, and locking accounts.
Helpful Resources:
— Tokenbound Documentation
— Tokenbound GitHub Repository
— Tokenbound V3
Full Implementation: Here’s the complete implementation of the frontend.
– Community Link:
Join our Telegram Community to ask questions and connect with other developers.
As you experiment with the SDK, we encourage you to explore its advanced features and think creatively about how Tokenbound Accounts can enhance your projects.